02: Bus Simulator
Estimated reading time: 10 minutes
Estimated time to complete: 2–3 hours (plus debugging time, which you will probably need)
Prerequisites: Assignment 01, Lab 03
Starter code: bus-simulator-student.zip
Collaboration: not permitted
A common task programmers handle is simulating something about the real world, with the goal of answering questions about how the world might behave. For example, protein folding, weather forecasting, and aerodynamic design are all areas where we ask computers to simulate some aspect of the real world, and use the data they produce to make decisions.
Overview
In this assignment, you’ll write a simple simulator for bus movement along a network of roads. We’ve provided you with starter code that models the roads, and a skeleton of a class representing a bus, but it will be up to you to translate a written description of how buses move into code.
We’ve provided a large set of unit tests to get you started with automated testing. We’ve also provided an interactive visualizer; as you’ll learn over time, sometimes it’s helpful to have more than just println and the debugger at your disposal when examining program behavior.
Goals
- Model state in an object.
- Translate a written description of behavior into code.
- Test code using both unit tests and an interactive visualizer.
Downloading and importing the starter code
As in Assignment 01, download and save (but do not decompress) the provided archive file containing the starter code. Then import it into Eclipse in the same way; you should end up with a bus-simulator-student project in the “Project Explorer”.
Examining what’s there
There are three classes in the simulator package that you should look over.
First, look at the RoadMap class. This class models a two-dimensional map; coordinates on the map are identified by an x and y coordinate. As you move north, the y coordinate decreases; as you move west, the x coordinate decreases. Each location on the map is either a road or not a road: the setRoad method lets you set a particular location to be a road (or not), the isRoad method checks whether a valid location is a road, and so on.
Next, look at the Bus class. A bus has a number and location associated with it (x and y) as well as a particular RoadMap. Bus also has a (currently empty) move() method. The comment above the move() method explains how it should work.
Next, take a look at (and perhaps run) the BusVisualizer class. Here, you can set up a map interactively, using the left mouse button to add or remove roads, the right mouse button to add buses, the delete key to remove them, and the spacebar to tell them to move(). Try it out, but you’ll find they don’t move (because, of course, the Bus.move() method is empty).
Finally, note we’ve provided you with a few unit tests. Some are mainly sanity checks; they test code that we wrote and that should work — unless you break something we provided! Others (in particular the ones starting with testMove...) are examining the behavior of the Bus.move() method, and will fail until you correctly implement it. It is important to note that these tests are not exhaustive: the Gradescope autograder may test your move() method more extensively.
What to do
Implement the move() method! Notice that the move() method is totally independent of the visualization code – you can write tests that don’t open the visualizer at all (as is the case for the tests we provide you).
You will need to add some state to the Bus class to keep track of what direction the bus is moving.
You will also need to add (probably to RoadMap) one or more method that, given a location, check whether the adjacent locations have roads, and use it/them in your move() method.
What it looks like
Here are a few buses moving around following the rules appropriately (each was stopped at in the first picture):
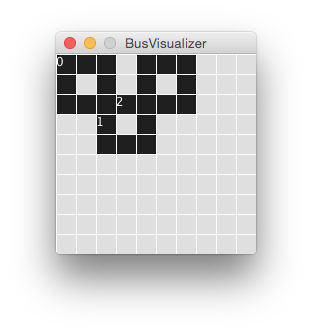


Notice that no buses went off the road!
Also, when running the visualizer, you might find that two buses end up in the same location. That’s OK: do not add collision detection, instead letting them pass through one another harmlessly, in much the same way real buses don’t.
Submitting the assignment
When you have completed the changes to your code, you should export an archive file containing the entire Java project. To do this, follow the same steps as from Assignment 01 to produce a .zip file, and upload it to Gradescope. Note that if you want things to upload faster, you can (carefully!) select only the src/ directory by expanding the project (click the little triangle to its left) and selecting only this directory; that’s all this autograder requires.
Remember, you can resubmit the assignment as many times as you want, until the deadline. If it turns out you missed something and your code doesn’t pass 100% of the tests, you can keep working until it does.